Showing posts with label Accessories Making. Show all posts

Sunday, April 17, 2011

Sea-Glass Bracelet

Glass and ceramic are used to make this ocean-blue-green bracelet. You'll need sea glass pieces of the same size and color for this project.
Bracelet How-To
1. Apply a dot of cement glue to each disk on a disk-and-loop bracelet form (available at jewelry-supply stores).
2. Adhere glass to disks, and let dry overnight.

Read more at Marthastewart.com: Sea-Glass Bracelet - Martha Stewart Crafts

Hard Flower Barrettes

These crepe-paper flowers are beautiful on their own or as one-of-a-kind fashion accessories.
Tools and MaterialsDouble-sided crepe paper
Petal-and-leaf template
Stapler
Scissors
Toothpick
28-gauge wire
Bamboo skewer
Hot-glue gun and hot-glue sticks
Smooth-Cast 327
Piece of Styrofoam
Pruners
Krylon clear matte finish spray
Small scrap of green felt
Pencil
Barrette or pin backing
Flower Barrette/Brooch How-To1. Cut three 6 1/2-by-2 1/2-inch rectangles from double-sided crepe paper.
2. Print template. Cut out the rectangle containing the petal shapes and stack on top of the three crepe-paper rectangles. Staple in place.
3. Cut out petals. You will end up with 3 teardrop-shaped petals and 9 heart-shaped petals.
4. To shape petals, cup in center; wrap left and right top edges around a toothpick to curl.
5. Build the flower by first placing teardrop petals, then heart petals around each other, holding the bottoms.
6. Fasten petals by wrapping wire around the base. Wrap the wire around a bamboo skewer; secure with hot glue.
7. Mix Smooth-Cast 327 according to manufacturer's directions. Dip the flower into the mix and shake off excess. Insert bamboo skewer into Styrofoam while the flower hardens. Repeat for a second coat.
8. Use pruners to snip off skewer "stem."
9. Spray both sides of the flower with Krylon clear matte finish spray. Allow to dry.
10. Cut leaf shape from template and trace onto green felt. Cut leaf shape from green felt. Secure a pin or barrette to the back of the flower and cover by gluing the green felt leaf over it with hot glue.

Read more at Marthastewart.com: Hard Flower Barrettes - Martha Stewart Crafts

Leather Cuff Bracelets

This sophisticated leather cuff from Gillian Stevens of Dewdrops Designs can be made for less than $15. Give to fashion-forward friends for a stylish Handmade Holiday Gift.

Tools and Materials

  • Surface (decorative) leather
  • Tooling leather
  • Grid ruler
  • 45-mm rotary blade
  • Leather glue
  • Edging solution
  • 1/2-inch cuff bracelet clasp
Leather Cuff Bracelet How-To1. Cut a 2 1/2-by-10-inch piece of surface leather, using a grid ruler as a guide (makes 4 to 5 bracelets).

2. Using leather glue, glue cut surface leather piece to a slightly larger piece of tooling leather, rough side to rough side. Smooth with hands to remove bubbles. Let dry overnight.

3. With craft knife, trim tooling leather around surface leather to make one neat strip. Use utility knife and grid ruler to cut the glued leather into 10-inch-long by 1/2-inch-wide strips. Apply edging solution to sides of each bracelet strip, starting at the top and pulling the solution towards you as carefully as possible to prevent getting any on leather.

4. Trim leather strips to desired bracelet size, accounting for size of clasp. Position leather strips into clasps; secure with leather glue.

Read more at Marthastewart.com: Leather Cuff Bracelets - Martha Stewart Crafts

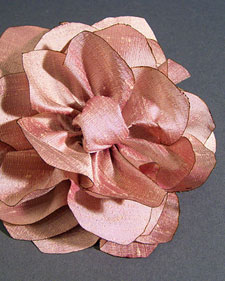
Silk Lotus Flower

Embellish your favorite outfit with this stunning lotus flower craft, made with luxurious silk taffeta, from "Cool Couture," by Kenneth D. King.

Tools and Materials
  • Crinoline (milliner's interfacing) or other stiff interfacing
  • 1/4 yard silk taffeta or dupion fabric
  • Scissors
  • Folding diagram
  • Hand-sewing needle and coordinating thread
  • Oil votive candle for singeing (optional)


Silk Lotus Flower How-To
1. Cut one 3-inch square from the crinoline and set aside. Cut five 3-inch squares from the silk. Following the diagram, fold and cut each silk square into a six-petal flower-shaped "unit."

2. In the center of one silk petal unit, sew a running stitch in a circle, about 3/8 inch in diameter. Draw this row of hand-stitching tight, and sew the center of the unit to the crinoline.

3. With the next four silk units, sew and gather progressively larger circles in the center of each (in terms of coins, these circles would be about the size of a dime, penny, nickel, and quarter). Sew each gathered unit to the crinoline on top of the previous one, containing the nub of fabric in the center of one petal unit inside the nub of fabric in the center of the next.

Tip: As you are sewing the petal units to the flower, make sure the ripples in the petals are evenly distributed around the flower. You can pull the petals one way or another and hand-tack in place to achieve this.

4. Turn the work over and trim the crinoline close to the stitches. Fluff the petals to give the flower life. Singe raw edges of flower, if desired.

Read more at Marthastewart.com: Silk Lotus Flower - Martha Stewart Crafts

Charming Locket

Tools and MaterialsAppliques
Nail glue, optional
Locket
Sandpaper
Paper towel
Colored nail polish
Tweezers
Toothpick, optional
Nail-polish remover, optional
Cotton swab, optional
Charming Locket How-To1. Lay out your appliques in the design you want to create, since you do not want to move the items on the polish once you put them down. If you want to add appliques on top of others (such as a rhinestone in the center of a flower), use nail glue to stick them on before you start.
2. Take a locket and sand the center of the outside. This will allow the nail polish to "grip" to something. Wipe away dust with a paper towel.
3. Pour colored nail polish onto center of locket and fill area. Use the nail polish brush to pull the polish to cover all points on the face of the outside of the locket. The paint should come all the way to the lip.
4. While polish is still wet, use tweezers to place desired appliques on locket. Sometimes nail polish gets drawn to appliques, so you can add additional polish to shallow areas with a nail brush or toothpick. Let dry overnight. If nail polish drips on your appliques, wait until it dries and clean it up using nail polish remover and a cotton swab.

Read more at Marthastewart.com: Charming Locket - Martha Stewart Crafts

Sequin Cuff Bracelet

Tools and Materials
  • Bias leather tape, approximately 1 inch wide and 7 1/2 inches long
  • Multi-row sequin trim, 3/4 inch wide and approximately 7 1/2 inches long
  • Magna Tac, or other fast-drying fabric glue
  • Metallic cord
  • Metal button
  • Needle and thread
Sequin Cuff Bracelet How-To
1. Measure leather tape around your wrist, adding 1/2 inch on either side to accommodate the button closure; trim excess.
2. Trim the length of sequin trim to the same size as the tape.
3. Apply a thin line of Magna Tac along each edge of the leather tape. Press the sequin trim into place; let dry.
4. Fold a cuff about 1/2 inch from front to back for the button side of the closure; apply glue and press into place. Cut a short piece (approximately 1 1/2 inches) of metallic cord to make the loop closure. On the opposite end of the tape, glue the ends of the cord to the back of the tape and fold a cuff over it from front to back. Glue to secure; let dry.
5. Once glue is dry, sew button to opposite edge of the tape.

Read more at Marthastewart.com: Sequin Cuff Bracelet - Martha Stewart Crafts